Monday, June 29, 2020

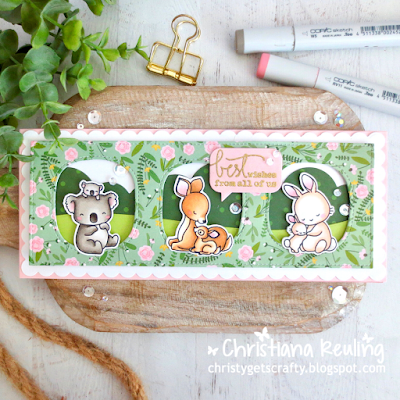
Little Things Slimline Card


Hello friends! Today I'm excited to share my first ever slimline card! I was a little intimidated to try out this new size, but I ended up really loving it! The Mama Elephant Slim Card Basics dies really did included everything I needed to make this card, aside from the cute critters, that is. For those, I used the adorable mamas and babies from Family Time. I stamped them in Lawn Fawn Jet Black Ink, colored them with Copics, and trimmed them out with the matching dies.


I created my card base by trimming my 8 1/2 x 11'' Ballet Slippers cardstock to 8 1/2 x 7'', and then scored the 7'' side at 3 1/2''. I cut the scalloped layer out of White cardstock, the hillside border out of Cilantro, and the bushes and frame from Lovely Moments 6x8'' patterned paper by Pebbles. I layered everything onto my card base and popped the frame and critters up with Foam Tape. Then I added a sentiment heat embossed sentiment using Ranger Superfine Gold Embossing Powder. As a finishing touch I added a sprinkle of Sparkling Clear Sequins and filled in the centers with Stardust Stickles.


As always, I finished off the inside of the card as well, using Lawn Fawn Bubblegum Ink, which you can check out in the video! Click below or watch on YouTube, and don't forget to like and subscribe! I thank you all for stopping by. Have an amazing day!

Friday, June 26, 2020

Magic Iris Camera with Underwater Scene - Lawn Fawnatics June Feature


Hi friends! Today I'm happy to be over on the Lawn Fawnatics Challenge Blog with a fun card using some brand new products from the Summer release! I combined the Magic Iris and Magic Iris Camera Add-on with the adorable Ocean Shell-fie to reveal a sweet little underwater scene. I'll have all the products and details over there, so I hope you'll hop over and check it out.

I project like this is really best illustrated in a video, so of course I created a tutorial for you! If you'd like to see this card come together, click below or watch on YouTube, and don't forget to like and subscribe!

Wednesday, June 24, 2020

Fox with Flowers - BRI Feature


Hi friends! Today I'm happy to be over on the Butterfly Reflections Ink blog with a cute card using the adorable Hooray Kind of Day stamp set from MFT. I will have all products and details listed over there, so please hop on over and check it out!

If you'd like to see how this card came together, watch below or on YouTube! And don't forget to like and subscribe! It means so much! Thanks so much for stopping by.

Monday, June 22, 2020

Rainy Day Background Card


Hey friends, happy Monday! Today I'm bringing you a card with a much requested background. I shared a card using the Hello Bluebird Rainy Day stamp set during my Rainbow & Basic Copic Color Combo Favorites video, but I had done the background off screen because the video was already long and that wasn't the focus. Well today I'm back with a new card featuring the other little girl, in combination with some images from Puddle Play.


I stamped my scene directly onto my panel with Lawn Fawn Jet Black Ink. Then I colored the images with Copics and did the background as well. I share every bit of the process in the video tutorial, so you can be coloring rainy day backgrounds like this in no time! When I was done, I trimmed the panel down with an MFT A2 Stitched Rectangle STAX Set 2 die, then mounted it over some Simple Stories Summer Farmhouse patterned paper on a Lawn Fawn Blue Jay card base.


I really hope you enjoy the video! If you do, please remember to give it a thumbs up and subscribe! Your support means the world. Thanks so much for stopping by today!


Thursday, June 18, 2020

Christy Gets Crafty with My Favorite Things - June


Hey friends, I'm so happy to be here with the June edition of Christy Gets Crafty with My Favorite Things! This month I chose to feature the adorable Sunny Vibes stamp set and create a scene where my hubby and I (in critter form) finally get to go on our dream tropical beach vacation! We were planning on celebrating that way for our 20th wedding anniversary this fall, but it looks like that's probably not going to happen thanks to the pandemic. Ah well, there's always next year, right?


So I stamped up these beachy images in Extreme Black Hybrid Ink, colored them with Copic Markers and trimmed them out with the matching dies. Then I created a background by masking off the sand, sea, and sky and sponging on Distress Oxide inks. I used Antique Linen and Gathered Twigs for the sand, Tumbled Glass and Broken China for the sea, and Tumbled Glass for the sky.


I trimmed the focal panel down with the A2 Stitched Rectangle STAX Set 2 and stamped a sentiment in the bottom right corner. Then I popped the focal panel up with foam tape on a Sno Cone card base. I adhered my images with liquid glue and added a few tiny clouds in the sky from Magical Friends to finish it up.


I really hope you enjoy the video! Please hit the thumbs up button if you do, and leave me a comment below the video on YouTube to let them know how I did! I love chatting with everyone! Thanks so much for stopping by today!

Monday, June 15, 2020

Double Shaker Balloon Card - Lawn Fawnatics #79


Hello! I'm back for my second post of the day, this time with our latest Lawn Fawnatics Challenge: Interactive Cards! I made a double shaker balloon card featuring Really High Five. I stamped my images with Jet Black ink and colored them with Copics and then trimmed them out with the matching dies


For the focal panel I made a background with the Cloudy Stencil and Tumbled Glass Distress Oxide Ink. Then I cut out two windows with the Outside In Stitched Balloon Stackables. I also die cut the balloons with Raspberry and Sticky Note Cardstock and adhered those through the holes to the card base. Then I covered the back of the focal panel with a sheet of acetate adhered with 1/8" Double-sided Tape.


I added lots of foam tape to the back, creating a little well around each balloon and filled them with Prisma GlitterChunky Glitter, and tiny iridescent stars. I attached it to my Mermaid card base, then I adhered my images with the assistance of my Reverse Tweezers and the Glue Tube. And as a final embellishment I added some dots of Liquid Stardust.


I also finished off the inside with Peacock Ink which you can check out in the video! If you like it, please be sure to hit the thumbs up and subscribe!


And now, head on over to the Lawn Fawnatics Challenge Blog and check out the other amazing products that the Design Team has created! You're sure to be inspired to create your own interactive cards and play along!

Waving Hello - Lawn Fawn Feature


Hello! Today is an exciting day, because I am being featured over on the Lawn Fawn blog with this cute card. I combined a whole bunch of sets including Mermaid for YouFlamingo Together, Swan SoiréeAhoy Matey, You are Sublime, and Life is Good. All other supplies used will be listed over there and linked below the video on YouTube.

If you enjoy it, please be sure to hit the like button and subscribe! Your support means the world. Thanks so much for stopping by.


Friday, June 12, 2020

Cloudy Day Card in 2 Parts


Hello friends, happy Friday! Today I'm doubly happy to bring you this card, because I have TWO videos to share with you! The Hello Bluebird Pathway Background is such a delight to color, but it does take some time. All together the video was about a half hour long, so I decided to split it into two parts. In Part 1, I'll be coloring just the background, and in Part 2, I'll show you how to color the Meadow Bunnies three ways, and complete the card. Don't worry, both videos are live now, so you can continue right on if you want to watch the whole thing, or if you need to take a break, you can come back to the other one later.


I colored the background and images with Copic Markers and trimmed out the bunnies with the matching dies. Then I trimmed down the background panel with the Lawn Fawn Outside In Stitched Rectangle Stackables and stamped a sentiment from Rainy Day. I adhered that to a Lawn Fawn Sticky Note card base with foam tape and finished off the inside using Sunflower Ink. As a final touch, I dotted on some Stardust Stickles for a tiny bit of sparkle.


I do hope you guys enjoy the videos! If you do, please be sure to subscribe to support my channel and get notified whenever I upload a new video. Thank you so much for stopping by today!


Monday, June 8, 2020

My Copic Favorites Series - Part 3: Refills and Marker Maintenance


Hello, friends! Today I'm happy to bring you the next installment in my Copic Favorites Series. I'm sharing with you how I refill my Copic Markers, and what maintenance I do to keep them in good working order so I can color my best! Everything you need to know is included in the video, as well as how I keep track of which Copic Markers and Various Ink Refills I own. I hope you enjoy it! Thanks so much for watching!

Monday, June 1, 2020

Hoppy Birthday - Lawn Fawnatics #78


Hello, and welcome to Lawn Fawnatics Challenge #78! This round is all about making my favorite kind of cards -- scene cards! I combined so many sets to create this hoppy birthday froggy scene, including Toadally AwesomeGleeful Gardens, A Bug DealOh Gnome!Really High FiveParty Animal and Mom + Me


I stamped out all my images and colored them with Copic Markers. I gave the frogs some dot detail to give them a little individual personality and did a two-tone color on the dragonfly's wings. Then I trimmed everything out with the matching dies.


I started building my scene directly on the Mermaid card base. I stamped my sentiment in Peacock Ink in the top right, and framed it in with a couple clouds from Spring Showers. I added a Meadow Border of Noble Fir and a Grassy Border of Cilantro Cardstock, which I popped up with foam tape. Then I adhered all my images to create a fun birthday scene.


If you'd like to see how this card came together, click below or watch on YouTube. And don't forget to like and subscribe! It truly means the world!


And now it's time to head over to the Lawn Fawnatics Challenge Blog and check out the other amazing scenes the Design Team has created! You're sure to be inspired to create your own scene cards and play along!

LinkWithin

Related Posts Plugin for WordPress, Blogger...