Saturday, March 31, 2018

Hello Friend


Hi there, friends! Today I'm super excited to bring you a card using a brand-new company called Hello Bluebird! They're pretty new to the stamping industry and just had their second release. I fell in love with their images from the minute I laid eyes on them, and couldn't wait to make a card as soon as I got them in my hands!

My favorite of the entire line is the adorable McGregor's Garden. As a longtime lover of Beatrix Potter, I thought the name of it was super cute too! This set is chock full of sweet little bunnies, but this one holding the flower pot is my fave, so I colored up him, one of the bluebirds, and the watering can with Copic markers.


I haven't seen any springy patterned paper pads lately that I love, so I shopped my stash and pulled out an older Echo Park pad that still had plenty of pretty patterns in it. I used Lawn Fawn dies and die cut the two larger background pieces with the Large Stitched Rectangle Stackables, the multi-color plaid pattern with the Stitched Scalloped Borders and the green plaid with the Grassy Border.

For the focal panel I used a Large Stitched Circle Stackable and added my cute images and a couple of clouds from Spring Showers

To finish things off, I die cut my sentiment with an Everyday Sentiment Banner and added a few Pretty Pink Posh Springtime Mix Sequins with a drop of Crystal Stickles in the centers.

I also did some stamping on the inside with Lawn Fawn Merman ink, but I'll save that for the video. ;) Click the YouTube icon to watch it there in HD, and don't forget to like and subscribe! I really appreciate it! Have a happy Easter!

Friday, March 30, 2018

Christy Gets Crafty with My Favorite Things - March


Hey friends! I'm so excited to bring you my March edition of Christy Gets Crafty with My Favorite Things! The number one question I get asked on my YouTube channel is how I mix and match patterned papers, so I thought I'd tackle that topic in this month's video.
 
Of course, the star of every card is the images, and today I featured the sweet new set Hoppy Friends. I colored them with Copics and cut them out with the matching die-namics. I used the Elegant Rectangle STAX for my focal panel and added a Grassy Hills border and a few clouds from Owl My Love to set the scene.

I pulled together papers from Plaid PatternsCalm & Cozy Chevrons, and Sweet Celebration in complimentary colors and patterns. Then I added a scripty sentiment die cut using the Friend Duo, and an additional sentiment from Anything-but-Basic Friendship trimmed out with a banner from Blueprints 29. To finish things off, I added a sprinkle of Sparkling Clear Sequins with a drop of Stickles glitter glue in the centers.


Check out the video on My Favorite Things YouTube Channel or watch it below. If you enjoyed the video and found the tips helpful, please be sure to give it a thumbs up and leave me a comment! I love to read your feedback. Thanks so much for stopping by today!

Saturday, March 24, 2018

Make A Splash


Hey friends, happy Saturday! Today I'm excited to be finishing out my first month as a Reverse Confetti 'Fetti Friend with this super cute card featuring the Sealiously stamp set. I actually combined four Reverse Confetti sets on this card. I just love how well their images play together!


I colored my images with Copic markers, including extra clouds from Honey Bear, the rock from Heart Spots, and the starfish from Mermaid Kisses. To give my background some texture, I die cut it with the Stitched Rays Cover Panel, and hand-drew and cut out some waves out of a dark blue cardstock.


I adhered some of my images flat to the card with liquid glue, then popped up the others with foam tape for some added dimension. Then I layered the focal panel on top of some stripey paper from the Fun Times 6x6 pad. On the inside, I stamped an additional seal and sentiment to finish off the card.


Check out the video below or click the YouTube icon at the bottom right to watch it there in HD. And please don't forget to like and subscribe! Your support means everything! Thanks so much for stopping by! Enjoy your weekend!

Friday, March 23, 2018

Rub-a-Dub-Dub - March Lawn Fawnatics Feature


Hey friends! Today I'm happy to be featured over on the Lawn Fawnatics Challenge Blog with a cute gender neutral baby card. I used the adorable Rub-a-Dub-Dub and took a more muted approach to our current rainbow Color Inspiration Challenge. I'll have more photos as well as all the details over there, so please hop over and check that out!


I also have a video tutorial for you, which you can watch below or click the YouTube icon at the bottom right corner to watch it there in HD. Please don't forget to like and subscribe! Your support means the world. Thanks so much for stopping by today!

Monday, March 19, 2018

Beam Up Some Fun - Lawn Fawnatics #25


Hey friends, happy Monday! Today is a special day for us at Lawn Fawnatics, because we are celebrating our first birthday! That's right, our challenge was born a year ago now! Isn't that exciting? To go along with our birthday celebration, we've got a fun Color Inspiration Challenge for you. And it's a RAINBOW!

For my card, I wanted to make a cool, interactive card using the new Beam Me Up, which has the best sentiments! Too fun! I colored my aliens and their accessories in rainbow colors, then created a galaxy background with Distress Inks. 


To make my cute little red alien "beam up," I also stamped the flying saucer and light beam in acetate, and created a pull tab slider. I die cut the channel with the Slide On Over dies and stamped the arrow and the word pull on my tab using Push Here


I added my flying saucer with two layers of foam dots on each end, leaving the center free so my alien can go straight from the planet to being in the cockpit with his friend.


And as if that weren't fun enough, I also made the card light the night, using the Glow in the Dark embossing powder. It really works!


 As a final embellishment, I scattered a few Pretty Pink Posh Iridescent Mini Star Confetti here and there to give the background some extra shine. It looks so pretty when they catch the light! 


I also did some fun stamping on the inside with Lights Out and JalapeƱo ink, but I'll save that for the video. Click on the YouTube icon at the bottom right if you'd like to watch it there in HD, and don't forget to like and subscribe! I really appreciate it!


Now please head on over to the Lawn Fawnatics Challenge Blog and check out the other designers amazing creations and link up your own rainbow inspired projects to play along!

Friday, March 16, 2018

Love You To The Core - Reverse Confetti SFYTT #58


Hey friends! Today I'm happy to be back as a Reverse Confetti 'Fetti Friend participating in the March Sketch For You To Try. Sketches are an awesome jumping off point for inspiration, whenever you're feeling stuck with a card design.

For my card, I used the sweet new Honey Bear stamp set, and decided to flip the center of the sketch on its side. I used the tree trunk to represent the brown stripe, the leafy top to represent the green stripe, and the pile of apples to represent the trio of yellow dots.

I used the Lacy Scallop Circle to represent the large red circle, die cutting it from patterns in the Fun Times 6x6  pad, including a grassy border using Nuts About You. Then added all my other elements into the scene. I popped the focal panel up on foam tape over another piece of patterned paper, and white embossed my sentiment on a black strip of cardstock to make it pop. As a finishing touch, I added some Clear Sparkle Pen to my apples to give them a little shimmer and shine.


On the inside of my card, I stamped the honey, honey bee, and an additional sentiment in a coordinating ink for a tone on tone effect, leaving plenty of room to write my message.


If you'd like to see how this card came together, you can watch below or click on the YouTube icon at the bottom right to watch it there in HD. And don't forget to like and subscribe! It really helps a lot, so I thank you.


You have until March 29th at noon CST to enter the March Sketch For You To Try, and you can enter as many times as you like! The winner will receive a $20 gift certificate to the Reverse Confetti Shop and claim the title of 'Fetti Fave. :) I can't wait to see what you all create!

Monday, March 12, 2018

Hummingbird Birthday


Hey friends, today I've got a sweet card for you using the beautiful Pretty Pink Posh Hummingbird Thanks and Pretty Petunias. I've been itching to play with these since they were first released!

I watercolored my images with Zig Clean Color Real Brush Pens, then watercolored a little background as well to show through my MFT Jumbo Peekaboo Circle Window. I also die cut my focal panel with the MFT Wonky Stitched Rectangle STAX to give it a pretty, decorative edge.


To finish things off, I added a few sequins from the Sparking Clear Sequin Mix with a dab of Crystal Stickles in the centers for some sparkle. Then added a sentiment from Mama Elephant's Labeled Messages.

I also did some fun stamping on the inside, which you can check out in the video! Click on the YouTube icon to watch it there in HD, and don't forget to like and subscribe! It really makes a difference!


Thank you so much for watching! Have an amazing day!
SaveSave

Thursday, March 8, 2018

Reverse Confetti March Release Blog Hop


Welcome to the Reverse Confetti March Release Blog Hop! All of these fantastic new products are available for purchase today at the Reverse Confetti shop, or your favorite crafty retailer! You should have come here by way of Amy's blog, where I'm sure she shared something totally amazing, but if you're just starting out you can head back to the Reverse Confetti blog to begin.


For my project, I created a little tag using the adorable new Honey Bear stamps and dies. This is the perfect thing to gift some of the absolutely delicious apple jelly my mother-in-law and I made when she was visiting from Germany in the fall. I spread a little of this on my whole grain toast every morning, and I am telling you, it is divine!

I colored my images with Copic markers, then added them to a tag die cut from the Fun Times 6x6 pad using the Dashed Line Tag. I also added a bit of ground for my cute little bear to stand on using the grassy border from one of my most favorite Reverse Confetti sets, Nuts About You.


The next stop on the hop is Laurie who is sure to blow your socks off! For the entire list, see below. Happy hopping!


SaveSave

Wednesday, March 7, 2018

Reverse Confetti March Release Countdown - Day 3


Hello there! I'm so happy to be back again for Day 3 of the Reverse Confetti: Countdown to Confetti. All week we're showcasing the great, new product that will be available for purchase on March 8th.


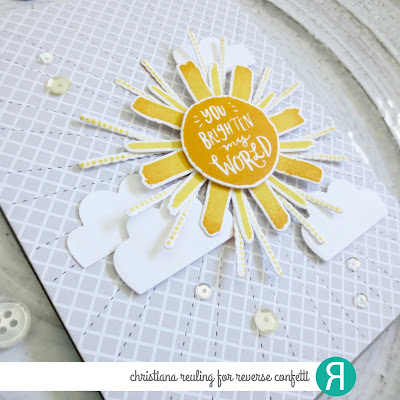
Today's reveal is My Sunshine, a super fun builder set with tons of versatility! I went with the obvious design for the outside of my card, and made a gorgeous sun with radiating rays in various shades of yellow. I also included a few of the cloud die cuts from Sealiously and Honey Bear. And of course, I used my favorite gray pattern from the new Fun Times 6x6 pad to create my sky. I ran that through my die-cutting machine with the Stitched Rays Cover Panel to give it that awesome detail.


On the inside of my card, I used the triangular rays in a different way, creating a sort of tribal pattern at the bottom. I also stamped another one of the four possible sun centers for an inside sentiment.


Now it's time to hop along and see what the rest of the Confetti Crew has to share with you today. Be sure to leave a comment at each stop for a chance to win a $15 gift certificate to the Reverse Confetti shop. When you're done, pop over to the Reverse Confetti Facebook page for a chance to win a second $15 gift certificate! All the details will be on the Reverse Confetti blog post.

and 'Fetti Friends
and me!


Tuesday, March 6, 2018

Reverse Confetti March Release Countdown - Day 2


Hey friends! I'm happy to be back for Day 2 of the Reverse Confetti: Countdown to Confetti! All of these amazing new products will be available for purchase on March 8th.


Today we are showcasing Tall Blooms. For my card, I chose to highlight two of the images and colored them with Copic markers. I added them on top of another new product, the Dashed Line Tag, which I die cut out of patterned paper from the Fun Times 6x6 pad. I am in love with this gray print -- you'll be seeing a lot of it from me here this week! Then I layered up a bunch of the other fun prints for some pretty pops of color.


On the inside of my card, I stamped another one of the gorgeous leafy branches in the Tall Blooms stamp set and left it at that, so the card can be used for just about any occasion that arrises!


Now it's time to hop along and see what the rest of the Confetti Crew has to share with you today. Be sure to leave a comment at each stop for a chance to win a $15 gift certificate to the Reverse Confetti shop. When you're done, pop over to the Reverse Confetti Facebook page for a chance to win a second $15 gift certificate! All the details will be on the Reverse Confetti blog post.

and 'Fetti Friends
and me!


LinkWithin

Related Posts Plugin for WordPress, Blogger...