Monday, October 29, 2018

2018 Holiday Card Series #3


Welcome to Day 3 of my 2018 Holiday Card Series! Today I'm featuring the adorable Hello Bluebird Fall Buddies, except I'm turning it into a Christmas card! These critters were just too cute in their little scarves. 

I wanted to pull in a pop of red, so I added in the two cardinals from Snow Play, colored all my images with Copics and trimmed them out with the matching dies.


For my background I sponged Spun Sugar and Picked Raspberry Distress Ink onto Bristol Smooth Surface Cardstock, and trimmed it down with the MFT A2 Stitched Rectangle STAX Set 2I heat embossed a sentiment and some snowflakes on the background, then added two snowdrifts using the MFT Hit the Slopes Die-namics edged with Tumbled Glass.

I layered this over top of my patterned papers from the Echo Park Merry & Bright 6x6 pad, and adhered my images with liquid glue. Before I added the squirrel, I drew in a shadow beneath him so it would look like he's making a snow angel.


To finish things off, I added a few Studio Katia Iridescent Crystals to the larger snowflakes and a bit of Crystal Stickles for some extra sparkle and shine. I also stamped on the inside with Lawn Fawn Plastic Flamingo ink which you can check out in the video.

Click the YouTube icon to watch there in HD, and don't forget to like and subscribe! You can also ring the notification bell if you want to be sure not to miss any videos in the series. Thanks so much for watching!

Friday, October 26, 2018

2018 Holiday Card Series #2 - Lawn Fawnatics Feature


Hi there! Welcome to Day #2 of my 2018 Holiday Card Series! Today's card features the adorable Lawn Fawn Holiday Helpers combined with Christmas Dreams. I created it for our current Lawn Fawnatics Challenge, and I'm sharing all the details and more pictures over on that blog, so I hope you'll come check it out and hopefully be inspired to play along!


I also created a video, of course! Click the YouTube icon to watch it there in HD, and don't forget to subscribe so you can watch the whole series as I add more videos from now until Christmas! Have a great day!

Tuesday, October 23, 2018

2018 Holiday Card Series #1


Hello! And welcome to the kickoff of my 2018 Holiday Card Series! I get so excited for this every year, and I hope that this will be my best one yet. I'm starting things off today with a brand new stamp set (releasing today!) by a brand new illustrator to the MFT team -- Stacey Yacula. The set is called Sweet Holiday Penguins and that perfectly describes it.


I started off by coloring my images and trimming them out with the matching dies. I wanted to create a spotlight shaker card with a scene within a scene, spotlighted by a snow globe. So I inked up a background with the Drifts & Hills stencil and Tumbled Glass Distress Ink, then die cut the center with the Snow Globe Die-namics. I glued the center die-cut onto a thin piece of white cardstock of the same size, then arranged my images within its borders, adding in a few Winter Trees

I piled my shaker material in the center, then added a Dome Shaker Pouch onto the outer panel with Scor-tape, and lined it all up over the spotlight scene and pressed it into place. Then I continued my scene around the shaker with a few more Winter Trees.


I finished it off with a sentiment stamped in Lawn Fawn Chili Pepper ink and some stamping on the inside as well, which you can check out in the video. Click the YouTube icon to watch it there in HD, and don't forget to like and subscribe! There will be lots more videos before the Holiday Card Series is over!


Thanks so much for watching!

Monday, October 22, 2018

Harvest Mice Blessings


Hey there, friends! Happy Monday! I'm super excited about today's card because this is one of my all-time favorite stamp sets and I finally got to use it! I think that MFT's Harvest Mouse by Birdie Brown is just the sweetest! 


I colored them with Copics and trimmed them out with the matching dies, then created a sunset background for them with distress inks. I cut out three openings from a piece of kraft cardstock with the MFT Stitched Triple Peek-a-Boo Windows, layered it over the sunset background with foam tape, and added my images into each section. Then I adhered that to a kraft card base. To glitz things up, I added some Spectrum Noir Clear Overlay Sparkle Pen to the leaves and harvest fruits.


I finished it off with a sentiment stamped in Lawn Fawn Walnut ink and a little more stamping on the inside, which you can check out in the video. ;) Click the YouTube icon to watch it there in HD or watch below! And don't forget to like and subscribe! I really appreciate it. Thanks so much for watching!

Friday, October 19, 2018

Christy Gets Crafty with My Favorite Things - October


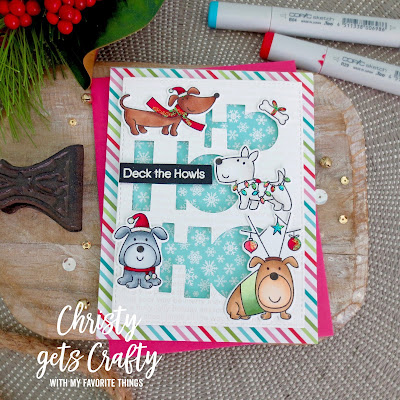
Another month, another edition of Christy Gets Crafty with My Favorite Things! I had such fun playing with this month's products! So much holiday goodness! The minute I saw the new Deck the Howls stamp set, I knew that was going to be my feature. I'm such a dog person!


Each one of these dogs are so cute, I couldn't decide which ones to use, so I ended up using them all! Four on the outside and one on the inside. I colored all my images with Copics and trimmed them out with the matching dies.


For my focal panel, I stamped and heat embossed the Christmas Background with Silver Pearl embossing powder onto some white cardstock for a subtle tone on tone effect. Then I die cut the Ho Ho Ho Die-namics from the center and popped it up over some patterned paper from the Candy Land Paper Pack. To finish things off, I added an additional sentiment and a little Crystal Stickles.


As I mentioned, I also did some stamping on the inside, which you can check out in the video! You can find it over on the MFT YouTube Channel or click below. And don't forget to leave me a comment and let them know how I'm doing! I really appreciate it! Thanks so much for stopping by!

Monday, October 15, 2018

Fall Fairy - Lawn Fawnatics Challenge #39


Hey friends! Happy Monday and welcome to Lawn Fawnatics Challenge #39! This round we're making blinged out projects, and what says glitter more than fairies? I decided to create a fall fairy card by combining Fairy Friends with Happy Harvest.


I colored my images with Copics and die cut them with the matching dies. For my focal panel, I die cut some Bristol Smooth Surface cardstock with the Lawn Fawn Stitched Circle Stackables, then blended on Distress Ink in Milled Lavender, Shaded Lilac, and Bundled Sage to create a twilight sky. Then I added my images with a combination of liquid glue and foam tape.


I layered my Kaisercraft Hide & Seek patterned papers onto my card base and popped my focal panel up over top. And then it was time for the bling! I added a sprinkle of Pretty Pink Posh Sparkling Clear Sequins and Crystal Stickles to the fairy wings, lights, and sky.


I also did some stamping on the inside using Fresh Lavender ink, which you can check out in the video. Click the YouTube icon to watch it there in HD, and don't forget to like and subscribe! It means so much!


And now it's time to head over to the Lawn Fawnatics Challenge Blog and check out the other amazing design team projects, and link up your own blinged out projects to play along! I can't wait to see what you create!

Monday, October 8, 2018

A Card Full of Hugs


Happy Monday, friends! Today I'm excited to share a fun card featuring Heffy Doodle stamps! They were so kind to contact me and ask if I might like to play with some of their products. Who could say no to so much cuteness?

My card features the adorable Yappy Happy Mail. These pups are so sweet, and I just had to color this one to look like my dog, Zadie.


I trimmed my images out with the matching dies and created a background for them using the MFT Cloud and Drifts & Hills Stencils and Tumbled Glass and Bundled Sage Distress Ink.

I used a postage edge die to trim out my panel and popped it up with foam tape over a red cardstock panel. To embellish the card base, I took all the envelopes, hearts, and paw prints images and stamped them around the edge with Lawn Fawn Deep Sea Ink. I added a two-part sentiment, using the Heffy Doodle Sending die cut from the same red cardstock as the middle panel.


I finished off the inside with some additional stamping which you can check out in the video. Click the YouTube icon to watch it there in HD, and don't forget to like and subscribe! It means the world!


Thanks so much for stopping by!

Monday, October 1, 2018

Lift-the-Flap Fall - Lawn Fawnatics Challenge #38


Hey friends! Welcome to Lawn Fawnatics Chalenge #38! This round we are inspired by the season. I always get excited for fall because it means I can pull out one of my all-time favorite stamp sets, Jump for Joy.


I combined it with the baby critters from Mom + Me, colored all my images with Copics to match my patterned paper, and trimmed them out with the matching dies.

For my focal panel, I used the Stitched Journaling Card die for the sky, and Stitched Hillside Borders for the grass. I die cut my leaf pile out of the green, leaving the left side attached to create a little flap. This was totally inspired by the lift-the-flap board books my boys used to love when they were little!


Then I glued my leaf pile over top and added the rest of my images around the pile and hiding my baby critters inside.  I used Merman ink to stamp my sentiment. 

I popped the focal panel up with foam tape over my patterned papers which I trimmed down using the Outside In Stitched Rectangle Stackables.


I finished off the card with some fun stamping on the inside in Walnut ink, which you can check out in the video. Click the YouTube icon to watch it there in HD, and don't forget to like and subscribe! 


And now it's time to head over to the Lawn Fawnatics Challenge Blog and check out the other amazing design team samples, and link up your Awesome Autumn projects to play along! I can't wait to see what you create!

LinkWithin

Related Posts Plugin for WordPress, Blogger...