Wednesday, June 28, 2023

Art Journal with Me #18 - See Possibility Everywhere


Hey friends, today I'm here with my June Art Journal with Me video. This month I used some patterned papers from the Prima The Plant Department Collection. I chose the doorway as my focal image to symbolize the new phase of life I find myself in, with my youngest child having graduated from High School earlier this month. I created the spread in my Square Art Journal, which I love. It's such a nice size to work in!


To create the collage look I love, I also added in some washi tapetickets, and other bits of vintage ephemera. For my personal item this month, I included a quote torn from an extra copy of the program from my son's graduation. I added color with Iridescent Gelatos, texture with Stencil Paste and a Brick Stencil, and the title using Tim Holtz Ideology Small Talk Stickers. As always, I finished up the spread with my Retro Date Stamp.


The video is about 45 minutes long, so grab some supplies or a snack and come hang out and spend time with me! I so enjoy our time together. Thank you so much for watching and showing your support. Have a great day!

Monday, June 26, 2023

Beach Buddy Birthday Card - Lawn Fawnatics Feature


Hey friends, I'm back with another card featuring the adorable pups from Lawn Fawn's Yappy Birthday, the Yappy Birthday Add-on, and the new Fruit Salad 6x6 pad. This one is for our current Lawn Fawnatics Challenge: Summertime Fun. I'm featured over on the blog today, so I hope you'll check out the post with all the supplies and instructions listed. I also have a video tutorial on my channel, which you can watch by clicking below or find it here on YouTube. I really hope you enjoy it! I had a blast making this one.

Saturday, June 24, 2023

Happy Woofday Birthday Card - Lawn Fawn Feature


Hey there! Today I'm so excited to be featured over on the Lawn Fawn blog and YouTube channel with a fun card using the brand new Yappy Birthday, the Yappy Birthday Add-on, and the new patterned paper pad, Fruit Salad. I'll have all other supplies and details listed over there, so I hope you'll check out the post! If you'd like to see how the card came together, you can click below or find the video here on YouTube. I really hope you enjoy it! Thanks so much for watching!

Friday, June 23, 2023

Go Wild Birthday Card


Hey friends, today I'm sharing a card that started out with some leftovers. I had a frame from a previous creation and a little lion I had colored probably a year or more ago. I built the rest of the card from there, using stamped images from Hello Bluebird's Jungle LittlesWoodland Littles, and a tiny cupcake from Cake Time. I colored the images with Copic markers and trimmed them out with the matching dies.


For the background, I did a simple watercolor wash using Distress Oxide Inks in Salvaged PatinaBundled Sage, and Pine Needles on some Bristol Smooth Surface Cardstock. Then I popped the Gallery Frame #2 that I had die cut out of Simple Stories Full Bloom 6x8 patterned paper and popped that up with foam tape. I stamped part of my sentiment and finished the rest using Jane Small Alphas and added a bit of Stardust Stickles.


If you'd like to see how this card came together, you can click below or watch it here on YouTube. I went through the whole process from picking out the leftovers, to Copic coloring, to assembling the final card. I really hope you enjoy it! Thanks so much for watching!

Monday, June 19, 2023

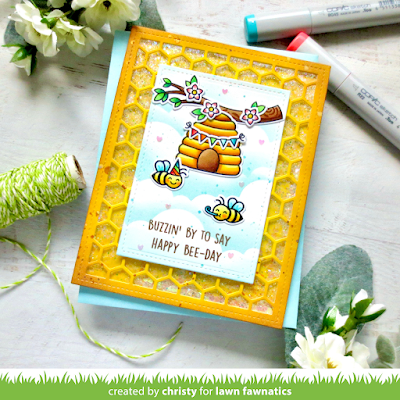
Buzzin' Bee-day Card - Lawn Fawnatics #151


Hey friends, today I've got a honey of a card to share with you for our newest Lawn Fawnatics Challenge: Summertime Fun! I have to confess, when I created my card, I hadn't read the fine print of the subtitle for this challenge, so I didn't realize that the critters were supposed to be on vacation! I was just thinking summer = bees and birthday bashes. So I guess my bees are having a stay-cation! Which is fine, because my family usually takes our vacation in the Wintertime to escape the snow. 


So for this one, I used a combination of image from Hive Five and Toucan Do It. I colored the images with Copic markers and trimmed them out with the matching dies. Then I created a focal panel by cutting down some Bristol with the Small Stitched Rectangle Stackables and blended on Salvaged Patina Distress Oxide Ink using the Cloudy Stencil.


I wanted to create a shaker card, so I took another piece of Bristol and blended on Squeezed LemonadeMustard Seed, and Vintage Photo Distress Oxide Inks. I used the shame shades on the front of a Sticky Note card base. On the Bristol panel, I also splattered Gansai Tambi Starry Colors and die cut it with the Honeycomb Backdrop. I glued a piece of Acetate to the back. Then I filled the card with Prisma GlitterChunky Glitter, and Iridescent Hearts and popped the frame overtop with foam tape.


If you'd like to see how this card came together, click below or watch here on YouTube, and don't forget to like and comment if you enjoyed it! Visit the Lawn Fawnatics Challenge Blog to see what the rest of the design team has created to inspire you, and link up your own Summertime Fun projects to play along! Thanks so much for stopping by!
 

Saturday, June 17, 2023

Sweet November Sizzling Summer YouTube Hop


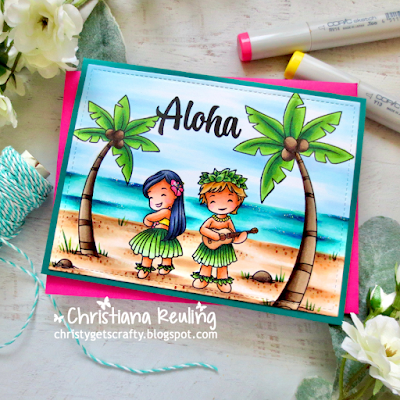
Hey friends, today I've got something super exciting to share! I'm taking part in the Sweet November Stamps Sizzling Summer YouTube Hop! We've got a fantastic lineup of talented designers ready to blow you away with their creations using the new release. AND there's a BIG giveaway of the entire release up for grabs, so stay tuned to learn how to enter!


I chose to feature the new Aloha Wees stamp set. It has been a dream of mine to visit Hawaii since I was a child, so when I saw this set, I fell instantly in love. I stamped out the images with Lawn Fawn Jet Black Ink on Spectrum Noir Ultra Smooth Premium White Cardstock and colored everything in with Copic markers, including the background. I'll have all the marker shades shown clearly in the video, so check that out for all of that info. Once I was done, I trimmed the panel down slightly with the Lawn Fawn Outside In Stitched Rectangle Stackables, and adhered it with liquid glue to a Lawn Fawn Rainforest card base. Then I finished with a little Stardust Stickles


So as I mentioned, this is for the Sweet November brand new release, which includes eight clear stamp sets, and YOU have a chance to win the entire collection! To play along, just visit each of the videos listed down below mine, subscribe to their channel, like the video, and leave a comment. You have four days to hop along, starting today, Saturday June 17th and ending on Tuesday June 20th. One randomly selected winner will be chosen and announced on Wednesday June 21st around 5pm PDT. The winner will have a week to reply, and if no contact is made, a new winner will be selected. Best of luck and happy hopping!


The Sweet November Sizzling Summer YouTube Hop Lineup:

Allison Cope – https://www.youtube.com/@AllisonCopeDesigns

 Thanks so much for watching! Enjoy!

Monday, June 12, 2023

Cottagecore Bunny Card


Hey friends, today I've got a sweet, cottagecore style card using the adorable bunny from Hello Bluebird Flower Friends. I colored the images to match the Carta Bella Here, There, & Everywhere 6x6  patterned paper pad, then trimmed them out with the matching dies.


For the focal panel, I cut down some Bristol Smooth Surface Cardstock with the Nesting Oval dies and blended on some Distress Oxide Inks. I used Shaded Lilac and Speckled Eggshell with the Lawn Fawn Cloudy Stencil for the sky, and Mowed Lawn and Shabby Shutters with the MFT Drifts & Hills Stencil for the grass. Then I chose four patterns from the paper pad to mix and match, and popped the focal panel up with foam tape.


If you'd like to see how this card came together, click below or click here to watch on YouTube. I really hope you enjoy it! Thank you so much for stopping by!

Friday, June 9, 2023

Garden Sunshine Card


Hey friends, today I've got a fun, garden-themed card for Spring using Hello Bluebird's Bloom and Grow. Last week I shared a Plan a Card with Me video where we figured out the supplies and layout of this card and in this week's video I am bringing that card together. You guys seem to really be enjoying seeing the entire process from concept to completion and I'm so glad! For this one I colored the images with Copic markers and trimmed them out with the matching dies.


For the background, I used the Lawn Fawn Cloudy Stencil to blend some Tumbled Glass Distress Oxide Ink onto Bristol Smooth Surface Cardstock to create the sky. Then I trimmed out two more panels with Grassy Knoll and blended on Twisted Citron and Rustic Wilderness and added them over top. I took two coordinating patterned papers from the Carta Bella Flora #6 6x6 pad and cut those out with the Gallery Frame #7 and popped up the frame with foam tape. I added my images and finished with a little Stardust Stickles.


To see how this card came together, including all the Copic coloring with tips, you can watch the video tutorial by clicking below or find it HERE on YouTube. I really hope you like it! Thank you so much for watching. Have a wonderful day!

Monday, June 5, 2023

Jungle Wild Birthday Card - Lawn Fawnatics #150


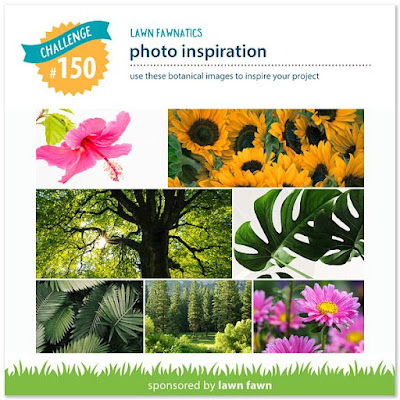
Hey friends, today I'm back with our latest Lawn Fawnatics Challenge, and this time we've got a fun photo inspiration for you guys! I always love these kinds of challenges because they are open to all kinds of interpretation. For my card, I decided to feature one of my all-time favorite sets, Toucan Do It, combined with Critters in the Jungle, and A Bug Deal. I colored the images with Copic markers and trimmed them out with the matching dies.


For the background, I took a panel of Bristol Smooth Surface Cardstock and blended on Distress Oxide Inks, starting with Squeezed Lemonade in the center, then Twisted Citron, and Mowed Lawn. Then I took the Birch Trees Stencil and blended on more Mowed Lawn and Rustic Wilderness to add the look of distant trees. Then I stamped a sentiment from Wild for You in Noble Fir Ink.


I glued the background to a Cilantro card base, then added a Stitched Hillside Border cut from Noble Fir Cardstock with foam tape for the ground. Then I just had to adhere my images, using a mix of liquid glue and foam tape. To finish things off I added just a touch of Stardust Stickles.


I really hope you enjoy this card! If you'd like to see how it came together, you can click below or find the video tutorial here on YouTube. If you do like it, I hope you'll consider subscribing to my channel! Don't forget to head over to the Lawn Fawnatics Challenge blog to see how our photo collage inspired the rest of the design team! We can't wait to see how you interpret this challenge!

LinkWithin

Related Posts Plugin for WordPress, Blogger...