Showing posts with label 2018 Holiday Card Series. Show all posts

Monday, December 17, 2018

Lawn Fawnatics Challenge #43 - Holiday Card Series #17


Hey friends! Welcome to Lawn Fawnatics Challenge #43! This round we are inspired by color. I've made a card using Thanks A Latte combined with Oh Snap to create a gingerbread spa day! Although, I have to say, one of these friends is enjoying it much more than the other. ;)


I colored my images with Copic markers and trimmed them out with the matching dies. Then I adhered them to some Really Rainbow Christmas Paper die cut with the Zig Zag Rectangle Stackables, and added a Gotta Have Gingham tablecloth to the bottom. 


For the background I used more Gotta Have Gingham papers die cut with the Outside In Stitched Rectangle Stackables. I added a sentiment stamped with Manatee ink and trimmed out with an Everyday Sentiment Banner and finished the card with some Crystal Stickles to give it a little shine.


This is also Day 17 of my 2018 Holiday Card Series. Click on the YouTube icon to watch the video there in HD, and don't forget to like and subscribe! It would mean the world to me.


And now it's time to head over to the Lawn Fawnatics Challenge Blog and check out the other amazing design team samples. And don't forget to link up your color inspiration projects to play along. I can't wait to see what you create!

Friday, December 14, 2018

Holiday Card Series #16


Hi friends! Well, my 2018 Holiday Card Series is winding down! I've got a few videos planned still to come, but I'll probably stop at around 20. Today is Day 16, and I'm bringing you a pair of sweet snowman cards featuring Hello Bluebird Frosty Friends. 


I colored my images with Copic markers, and while I was at it, I decided to make two cards since I recently ran out when I was sending them out. I still need to make about a dozen cards to cover everyone on my list! Once they were colored, I trimmed them out with the matching dies.


To set my scene, I trimmed down some Lawn Fawn Stitched Hillside Borders out of Simple Stories Merry & Bright patterned paper to make some snowdrifts, and adhered those to the background snowflake pattern. I glued those flat to the card. Then I trimmed down a coordinating pattern with the Lawn Fawn Large Stitched Rectangle Stackables, cut out the mid section, and popped those up with foam tape on the top and the bottom. 


I adhered my images into the recessed scene area and added a speech bubble sentiment. For some bling, I embellished my images with Christmas Red, Green, and Crystal Stickles, and I finished off the inside with some stamping in Lawn Fawn Manatee ink.


Click the YouTube icon to watch the video there in HD, and don't forget to like and subscribe! It truly means so much! I hope you all have an incredible day! Thanks so much for stopping by.

Monday, December 10, 2018

Holiday Card Series #15


Welcome to Day 15 of my 2018 Holiday Card Series! Today I'm sharing a card using the adorable Oh Kitty Tree stamp set by Mama Elephant. I have so many friends who are cat people that would love this card! Especially since you can really personalize it by coloring the kitties to look like their fur babies.

On today's card I decided to stick with a neutral color palette for the cats. I used a variety of warm and cool gray Copics, and let the accessories carry the punches of color. Then I trimmed it out with the matching dies.


For the background, I ink blended some Tumbled Glass Distress Ink onto a piece of white cardstock, creating a glow that would come from behind my kitty pile. Then I trimmed that down with a Mama Elephant Peek A Frame.

I popped that up with foam tape over my Doodlebug Christmas Town 6x6 patterned papers, which I adhered to my standard-sized card front. To finish off the card I used some Crystal Stickles and stamped an additional image and greeting inside with Mama Elephant Scripty Xmas.


Click on the YouTube icon to watch the video in HD, and don't forget to like and subscribe! I'm still trying to hit 20k subscribers by the end of 2018, and I'm less than a thousand away. With your help I can do it! And I appreciate it so much. Thanks so much for watching, and for stopping by today!

Friday, December 7, 2018

Holiday Card Series #14


Hey friends, welcome to Day 14 of my 2018 Holiday Card Series! I had so much fun mixing and matching different Neat & Tangled sets for this card. I used Oh Deer, Get Yeti, Santa's Wonderland, and Beary Merry and colored them all with Copic markers.


I trimmed my My Mind's Eye Winterberry patterned paper down with the Neat & Tangled Scalloped dies and popped that up with foam tape over the rest of my patterned papers, which were adhered to an A2 Standard Size card base. To finish it off, I added a few dabs of Crystal Stickles.


Click on the YouTube icon to watch there in HD and don't forget to like and subscribe! I'm trying to reach 20k subscribers by the end of 2018 and I'm only about a thousand away, so I'd really appreciate your support! Thanks so much for stopping by today!


Monday, December 3, 2018

Lawn Fawnatics #42 - Holiday Card Series #13


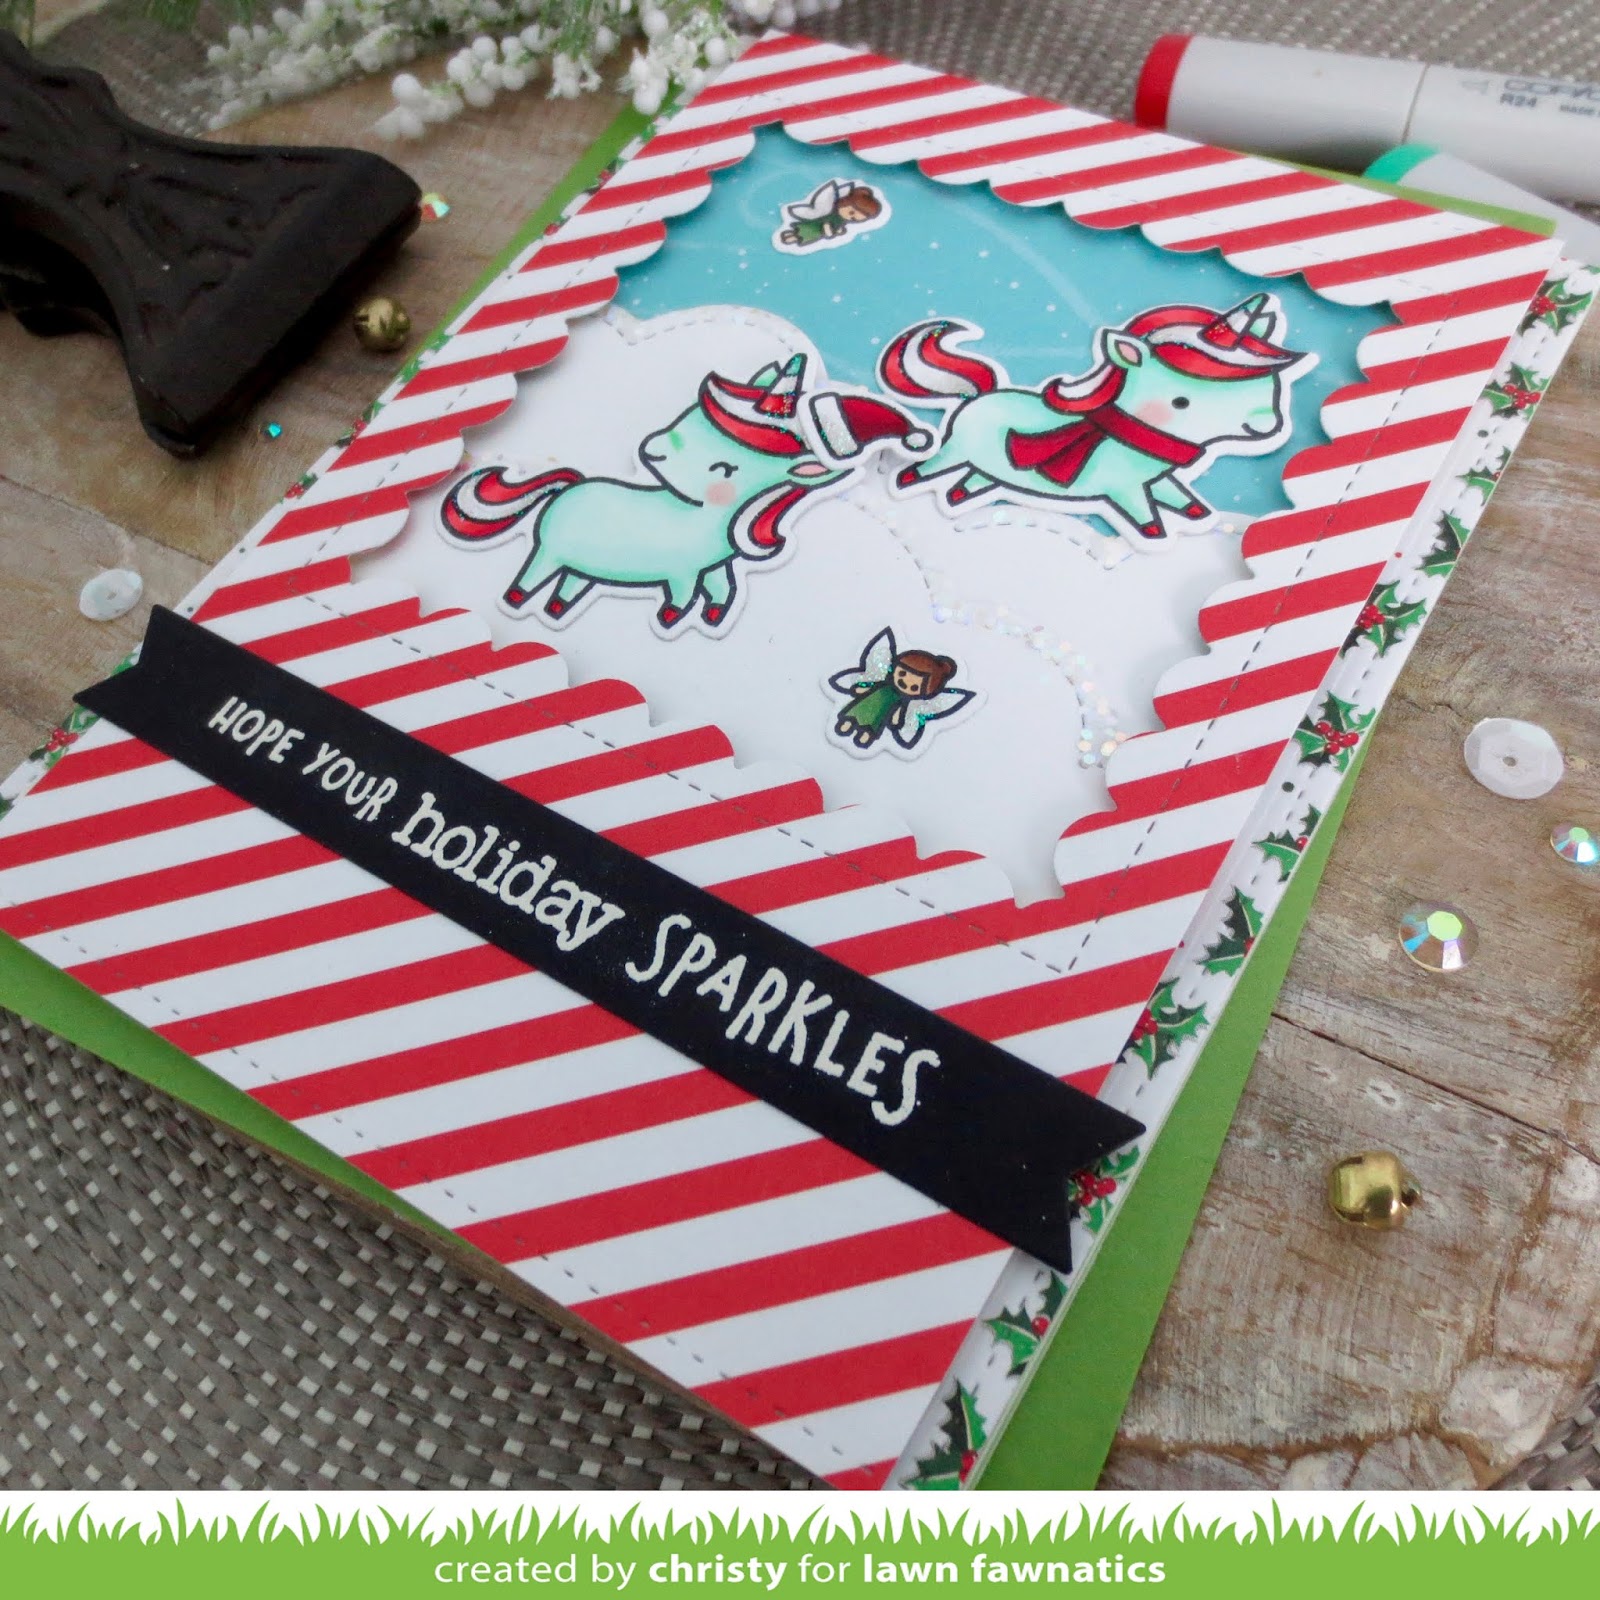
Hey friends! Welcome to Lawn Fawnatics Challenge #42! Today we are celebrating the Winter Holiday Season! My card features the adorable Winter Unicorn, combined with the Black Friday exclusive A Little Sparkle. But don't worry if you missed it! It will be released at a later date.


I colored all my images with Copics, making the unicorns minty fresh with peppermint hair. I also added in a santa hat from Cheery Christmas to give the A Little Sparkle unicorn some holiday flair. Then I trimmed them out with the matching dies.


I used patterned paper to create my background and layered some Puffy Cloud Borders over top, which I trimmed in Chunky Glitter using the Glue Tube. I die cut a window out of the red and white patterned paper using the Reverse Stitched Square Windows. Then I layered that on top of a holly print. I white heat embossed a sentiment onto an Everyday Sentiment Banner and finished off the card with some Crystal Stickles for extra sparkle.


On the inside I did some fun stamping in Celery Stalk ink which you can check out in the video. Click the YouTube icon at the bottom right to watch it in HD, and don't forget to like and subscribe! This is also Day 13 of my 2018 Holiday Card Series, so I hope you enjoy!


And now it's time to check out the other amazing design team samples! Head to the Lawn Fawnatics Challenge blog, and link up your own winter celebration projects to play along!

Friday, November 30, 2018

Holiday Card Series #12


Hey friends! Welcome to Day 12 of my 2018 Holiday Card Series! Today I have a sweet little scene using the adorable Christmas Is Coming by Hello Bluebird. Aren't these critters just the cutest? In my mind, they all set out to find the perfect Christmas tree, and now they're heading back to their den to decorate it all up!

I watercolored my images using Zig Clean Color Real Brush Pens and die cut them with the matching dies. Then I set them aside to work on my background.


For that, I colored again with my Zigs, and blended it with a wide, flat brush and some clean, clear water. Once that was dry, I trimmed it down with the Lawn Fawn Outside In Stitched Rectangle Stackables. I white heat embossed a few snowflakes on the background, and clear embossed the black sentiment to give it some shine.

I added two snowdrifts using Lawn Fawn's Stitched Hillside Borders and popped my critters up with foam tape. As a final embellishment I adhered some tiny Studio Katia Iridescent Crystals to the centers of the embossed snowflakes.


I also finished off the inside with some stamping in Lawn Fawn Juice Box ink. Click the YouTube icon to watch it there in HD, and don't forget to like and subscribe! I'm so close to hitting my goal of 20K by the end of 2018! Thank you so much for all your support!


Monday, November 26, 2018

2018 Holiday Card Series #11


Hello! Welcome to Day 11 of my 2018 Holiday Card Series! Today I'm bringing you a peaceful scene created with Little Angels from MFT. Aren't they just gorgeous? 

I colored my angel and dove with Copics, choosing soft colors that would really contrast against the dark background. Also, I wanted the angel to appear as if she was almost glowing with light and love. Once I was done, I trimmed them out with the matching dies.


For my background, I sponged on distress ink in Peacock Feathers, Chipped Sapphire, and Black Soot to create a night sky, then trimmed it out with the Single Stitch Line Tag Corner Die-namics. I  adhered the outer edge and inside panel flat to the card. 

Then I took the frame and adhered some acetate to the back and popped that up with a layer of foam tape. Before I added it to the card, I put in a pile of Pretty Pink Posh Silver Star Confetti, 4mm Gold Sequins, and Sparkling Clear Sequins, plus Lawn Fawn Chunky Glitter for some added sparkle.


To finish off the card I added a Lawn Fawn Puffy Cloud Border, and a white heat embossed sentiment on black cardstock, trimmed out with one of the Blueprints 29 Die-namics. I glued down an extra sprinkle of sequins and stamped on the inside with Lawn Fawn Peacock ink. 

And while I was at it, I made two! Click the YouTube icon to watch the video in HD, and don't forget to like and subscribe! My goal was to reach 20K subscribers by the end of 2018, and I'm getting close! I'd really appreciate your support! Thanks so much for stopping by today!

Friday, November 23, 2018

Lawn Fawn Feature - Holiday Card Series #10


Hey friends, today I'm happy to be featured over on the Lawn Fawnatics Challenge Blog with a sweet treat of a card that matches the gift tags I shared on Wednesday. I made them using Lawn Fawn's Gingerbread Friends dies, but you can hop over there for all the details and more photos.

It's also Day 10 of my 2018 Holiday Card Series, and I'll be sharing the process of making the card and tags in one video. Click the YouTube icon at the bottom right if you'd like to watch it there in HD, and don't forget to like and subscribe! It really makes a difference, and I appreciate it so much!


There is still time to enter our shaped card challenge at Lawn Fawnatics! Take some time over the holiday break and get crafty. We can't wait to see what you come up with!

Monday, November 19, 2018

Lawn Fawnatics #41 - Holiday Card Series #9


Hey friends, welcome to Lawn Fawnatics Challenge #41! This round is all about shaped cards. So fun! I decided to make a Shadow Box Card, featuring Joy to the Woods. I colored my images with Copics and trimmed them out with the matching dies.


I used the Shadow Box Card die to trim out two panels from Chili Powder Cardstock and the Ocean Add-on to die cut the scalloped opening and the snow banks for a more windswept look. I adhered all my images with mini glue dots and added a sentiment placard from Ready, Set, Snow with Walnut ink.


This also happens to be Day 9 of my 2018 Holiday Card Series! Click the YouTube icon at the bottom right to watch there in HD, and don't forget to like and subscribe!


And now its time to head over to the Lawn Fawnatics Challenge Blog and check out the other amazing design team samples! Then you can get to crafting your shaped cards and link up to play along!

Have a great day!

Wednesday, November 14, 2018

Fawn Holiday Week - 2018 Holiday Card Series #8


Hello friends! Today I'm so excited to be participating in Fawn Holiday Week with Lawn Fawn! There is so much holiday inspiration happening over there -- you're definitely going to want to check it out.

For my card, I wanted to create a fun scene with a polar bear surprising his tree decorating friends combining Beary Happy Holidays, Jump for Joy, Cheery Christmas, Baaah Humbug, and Trim the Tree. I colored my images with Copics and trimmed them out with the matching dies.


I used the Stitched Scalloped Rectangle Frames to trim the outside frame from red cardstock and the inside with the snowfall print from the Really Rainbow Christmas 6x6 pad. I added a snowdrift overtop with Stitched Hillside Borders.

My images were adhered with the Glue Tube and popped the focal panel up with foam tape over another piece of patterned paper trimmed down with the Stitched Rectangle Stackables. Then I stamped my Tiny Tags Sayings sentiment with Manatee ink and trimmed it down with a Stitched Scalloped Circle and stuck it at the top to resemble the moon. 


To finish off the card I added some Spectrum Noir Clear Overlay Sparkle Pen to the ornaments and light bulbs, and covered those with Glossy Accents, and dabbed a little Crystal Stickles on the scarf, ribbons, and santa hat.

I also did some fun stamping on the inside with Hippo ink, which you can check out in the video. Click the YouTube icon at the bottom right to watch it there in HD, and don't forget to like and subscribe! I really appreciate it!


And now please head over to the Lawn Fawn blog and check out all the other amazing and inspiring samples that so many designers have for you today! You'll be glad you did!

Monday, November 12, 2018

2018 Holiday Card Series #7


Hello! Welcome to Day 8 of my Holiday Card Series! Today I'm featuring the sweet penguins from Hello Bluebird Snow Play. Aren't they darling? I just love them! I colored them up with Copics and trimmed them out with the matching dies.

For my focal panel, I die cut some MFT Cement Gray Cardstock with the Lawn Fawn Stitched Circle Stackables and added a snowdrift using the MFT Hit the Slopes and Elegant Rectangle STAX Die-namics.


I stamped my sentiment on the snowdrift and the snowflakes on my focal panel with Lawn Fawn Hippo Ink, then arranged my penguins to look like they're having a snowball fight.

I trimmed down my My Mind's Eye Winterberry patterned papers with the Lawn Fawn Stitched Rectangle Stackables and Stitched Scalloped Borders, and layered them on my card base with Tombow Mono Multi Glue. Them I popped up my focal panel with Scotch 3M Foam Tape.


To finish off the card I added Crystal Stickles to the snowball and the top edge of the snowdrift. Then a sprinkle of Pretty Pink Posh Sparkling Clear Sequins, and filled in the holes with Christmas Red Stickles for an extra pop of color. I also stamped a few more images and a greeting on the inside of the card, which you can check out in the video tutorial. 

Click the YouTube icon at the bottom right to watch it there in HD, and don't forget to like and subscribe! It helps my channel a ton, and I sure do appreciate it! Thanks so much for watching!


Friday, November 9, 2018

2018 Holiday Card Series #6


Hello and welcome to Day 6 of my 2018 Holiday Card Series! Today I'm bringing you a card so cool, you'll feel like bundling up! Lol. My arctic setting centers around the gorgeous background image from Avery Elle's Starry Scene.

But before I get to that, I stamped out all my images, including the polar bear from Winter Woodland Wonders, colored them with Copic markers, and trimmed them out with the matching dies.


I inked up the background image with Lawn Fawn Merman, Peacock, and Blue Jay ink. Then I die cut the Starry Scene opening out of some plain white cardstock, added foam tape to the back, and popped it up over the stamped background to create a little window and give the scene some depth.

I stamped my sentiment with Lobster ink onto a snow bank die cut with Lawn Fawn's Stitched Hillside Borders and adhered that to the bottom of my scene. I tucked my mountain range inside the window and arranged the trees and polar bear on the outside.


And because I simply don't seem capable of making a holiday card without at least a little bit of glitter, I finished things off by adding Crystal Stickles to the snow caps and trees, and Christmas Red Stickles to the polar bear's scarf.


And now for the video! Click the YouTube icon at the bottom right to watch it there in HD, and don't forget to like and subscribe! Consider it my Christmas gift. ;) I hope you enjoy the video! Thank you so much for watching!

Monday, November 5, 2018

Holiday Card Series #5 - Lawn Fawnatics Challenge #40


Hey friends! Welcome to Lawn Fawnatics Challenge #40! This round we've got a gorgeous rainbow of color to inspire you. I created an entire collage of Lawn Fawn critters -- perfect for those of you who love to color as much as I do!


I pulled in images from Beary Happy Holidays, Cheery Christmas, Toboggan Together, Winter Otter, Sealed with a Kiss, and stamped a sentiment from Merry Messages in the center. Then I colored them all in with Copic markers.


I stamped snowflakes all around in Lobster, Wild Rose, Plastic Flamingo, Carrot, Sunflower, Freshly Cut Grass, Merman, and Fresh Lavender ink. Then I trimmed the edges with the Outside In Stitched Rectangle Stackables and adhered it to a light purple card base. 

As a finishing touch, I added a sprinkle of Pretty Pink Posh 4mm and 6mm Marshmallow Sequins. I also used my Spectrum Noir Clear Glitter Overlay Pen on the ornaments, and coated them with Glossy Accents.


This is also Day 5 of my 2018 Holiday Card Series! Click the YouTube icon to watch there in HD, and don't forget to like and subscribe! I still have lots more videos to go!


And now it's time to head over to the Lawn Fawnatics Challenge Blog and check out the other amazing design team samples. And don't forget to link up your color inspired projects to play along!

Friday, November 2, 2018

2018 Holiday Card Series #4


Hi everyone! Welcome to Day 4 of my 2018 Holiday Card Series! Today's card, or should I say cards, features ten of the cutest little snowmen you ever did see! 

I started by stamping out my images from Mama Elephant's Little Snowman Agenda, coloring them with Copics and trimming them out with the matching dies. And they were so quick and easy to color, I decided to do two sheets and get two cards made in the time it usually takes me to make one!


To showcase all my little guys, I die cut the MFT Horizontal Collage Cover Up out of Black Licorice cardstock, and popped that up with a thin layer of foam tape over patterned paper from the Echo Park Celebrate Christmas 6x6. I framed this with another sheet of patterned paper and adhered it all to a Chili Pepper card base, reversing the color scheme for each card.

Then I popped my snowmen into each of the little squares. I white heat embossed a Scripty Xmas sentiment onto the center panel and added a sprinkle of Sparkling Clear Sequins and filled in the holes with Stickles in Christmas Red, Green, and Crystal.


I also did some stamping on the inside, which you can check out in the video. Click the YouTube icon to watch there in HD, and don't forget to like and subscribe! It truly means the world. :) Thanks so much for watching!

Monday, October 29, 2018

2018 Holiday Card Series #3


Welcome to Day 3 of my 2018 Holiday Card Series! Today I'm featuring the adorable Hello Bluebird Fall Buddies, except I'm turning it into a Christmas card! These critters were just too cute in their little scarves. 

I wanted to pull in a pop of red, so I added in the two cardinals from Snow Play, colored all my images with Copics and trimmed them out with the matching dies.


For my background I sponged Spun Sugar and Picked Raspberry Distress Ink onto Bristol Smooth Surface Cardstock, and trimmed it down with the MFT A2 Stitched Rectangle STAX Set 2. I heat embossed a sentiment and some snowflakes on the background, then added two snowdrifts using the MFT Hit the Slopes Die-namics edged with Tumbled Glass.

I layered this over top of my patterned papers from the Echo Park Merry & Bright 6x6 pad, and adhered my images with liquid glue. Before I added the squirrel, I drew in a shadow beneath him so it would look like he's making a snow angel.


To finish things off, I added a few Studio Katia Iridescent Crystals to the larger snowflakes and a bit of Crystal Stickles for some extra sparkle and shine. I also stamped on the inside with Lawn Fawn Plastic Flamingo ink which you can check out in the video.

Click the YouTube icon to watch there in HD, and don't forget to like and subscribe! You can also ring the notification bell if you want to be sure not to miss any videos in the series. Thanks so much for watching!

LinkWithin

Related Posts Plugin for WordPress, Blogger...