Sunday, October 31, 2010

I Still Do Blog Candy Giveaway

Hey there, Girlies!
How are you all tonight?
How about something that might
 make it even better?

Say, maybe some Blog Candy?


In honor of my husband's and my
10th wedding anniversary
later this month, I thought I'd
pass along some of my happiness
in the form of some wedding-themed
blog candy.

Here's what's up for grabs:
1 wedding stamp set by Doodlebug Designs
1 love stamp set by Art Warehouse
1 set of glittery prima roses
1 pack of Mrs. Grossman's laser cut stickers
(these would be fun to use as a mask)
1 pack of varigated adhesive-backed pearls
and 2 yards of Offray lace

Because this is a reader-appreciation giveaway,
you MUST be a follower of this blog
to enter this giveaway.
You MAY become a follower
to enter, but please do so only if you enjoy
yourself here and would like to stick around.
(I am a pretty fun person,
if I do say so myself!) ;o)

So here's how you can enter:
1. be a follower of this blog
2. pass the word. Copy the candy pic
and post it on your own blog
with a link back here.
Sidebar is fine.
3. leave me a comment telling
me something you still love about
your husband/boyfriend/
significant other/best friend/
whatever.

Share the love, people. :o)

And that's it!
Please leave one separate comment
for each step you've done.
That means if you've done all three,
you've left me three comments,
and therefore have three chances to win.

Good luck!
Contest ends at 11:59 PM
October 31st, 2010.

(This post will remain on top
until the contest is closed.
Please scroll down for new posts.)

Friday, October 29, 2010

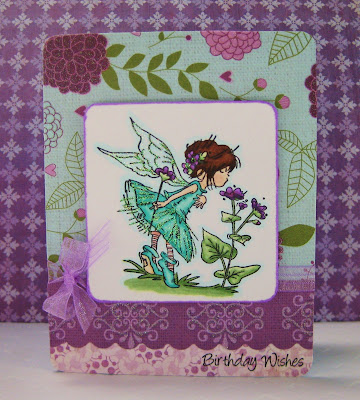
Fairy Birthday Wishes


Happy Friday, everybody!
I'm really excited to show you the card I made this afternoon.
This is definitely my favorite of all the cards I've ever made.
I love the image, the paper, and I'm just really pleased
with how it turned out.

Wanna see?


I spent about three hours last night mounting my new
Lili of the Valley stamps on EZ Mount and trimming them out.
Ack! It was so nerve-wracking!
I was so afraid I was going to cut through one of
the images, I probably made it a lot harder than
it had to be. Anyway, it was worth it!

Just look at this little fairy. Isn't she darling?
I colored her in with copics, then added some stickles
to her wings, dress, and the centers
of the flowers in her hair.


To assemble the card, I started with ocean blue
Bazzill cardstock, and covered the bottom with a
leftover scrap of Basic Grey patterned paper.
I stamped my sentiment in the bottom right corner
with Memento ink in Tuxedo black.
Then I laid down some DCVW glittered paper over
the rest of the card front, and covered the seam
with a scrap of glittered Colorbok paper
that I cut with my Fiskars scallop punch.

I sliced into the seam of my card to thread
through some sheer sparkly ribbon from my stash,
then mounted my image with dimensional
adhesive and rounded all the corners.


I hope you like it!

Are you dressing up for Halloween?
I have to for work, so I'm going as the
Roaming Gnome. Should be fun!

Have a wonderful weekend, everybody!

Tuesday, October 26, 2010

It's A Love Thing


From the moment I laid eyes on him
I knew.

Amazing to think that it's been
ten wonderful years
married to this man who
impresses me, cares for me,
inspires me, makes me laugh,
rescues me, loves me
each and every day.

A man like that
deserves a special card --
not too frilly, but still romantic,
a card that lets him know
he still sets my heart to flutter
everytime I look at him.


For my anniversary card,
I decided to go with classic, elegant black
with muted tones of silvery gray
and white.

I selected this patterned paper by
Best Occasions, trimmed it down to size,
and stamped my sentiment from
Stampology. Punched out an additional
black butterfly with an EK Success punch,
and adhered it with a mini glue dot in the center.


I then wrapped around some
American Crafts ribbon and attatched it
with my stapler in a criss-cross pattern.
I mounted this on black Bazzill cardstock,
added a button to my ribbon
and stickles to my mini butterfly.
(Glitter may be girly, but I couldn't resist!)


So, to celebrate
our ten years of wedded bliss,
my husband and I went away for
the weekend -- back to Fairlawn,
in fact. We had such a nice time on
our day trip this summer,
we decided to go back.

Which meant that I got to go to
Archivers, Hobby Lobby, and Pat Catan's!
So fun. I picked up some things that
had been on my wishlist for a long while,
including Tim Holtz's Tiny Attacher
and refills, some baker's twine,
new stamps, my favorite Signo white gel pen,
plus...
Are you ready for it?
The Clip It Up!
Since I had two 30% off coupons,
my sweet hubby bought me the base unit
as my anniversary gift
and I bought myself the upper tier.
I put it together first thing when we got home
and I LOVE it!
I'll have to show pics another night.

We also had some GREAT food --
Five Guys burgers and fries (so yum)
and P.F. Changs -- bless the sweet Lord
for giving His creation the ability
to combine flavors like that!
Delicious just doesn't describe it.
If you ever get a chance to go to one -- do!

Well enough from me tonight.
Hope you all have a wonderful
day tomorrow!
Night-night.


Wednesday, October 20, 2010

Set Your Heart On Something Beautiful


Hi there!
I wanted to pop in and share another card.
Wow, I'm doing pretty good on the crafting front
this week, aren't I?
Take a look at this one.


This card actually looks so much prettier in person.
For some reason my camera does not photograph
light colors well. But I think you get the jist of it.

The image is from Lili of the Valley.
Isn't it pure sweetness?
I love it.
It reminds me of my aunt Cheryl and I
(she's just two years older than me)
when we were growing up together.
In fact, I'm going to give it to her.


I've actually been working on coloring this image
for a couple of weeks. I've had it sitting on my desk,
and each morning while waiting to get into the bathroom
(which is right outside my office)
I've colored it a little bit more.
Let me tell you, sharing one tiny bathroom
with a grown man and three boys
teaches you a lot of hard lessons in patience.
Not to mention hygiene. Ick.
Anyway,...


I paired it with this great text print from the
All About Girls mini stack from DCWV.
It says sweet things like "strike a pose",
"you are beautiful", "share your gifts",
and "have a lovely day."
Plus it has a built-in sentiment --
"set your heart on something beautiful"
above that great minty green scalloped border.

To make the image stand out more,
I mounted it first on a green gingham print
from the same stack, rounded all the corners
and popped it up with dimensionals.
Then I added a scrap of purple
Pure Color ribbon, tied in a bow, and
cut the ends into a V shape, which
seemed to fit the image.


Hope you like it!
Okay, gotta run!
Hell's Kitchen is starting and I've got
to get the kids in bed.

Have a great night!

Monday, October 18, 2010

Have A Blooming Good Day


Happy Monday, everybody!
I'm in a good mood today because it's my
day off! Yay! I'm going to be getting all sorts
of crafty today, from a roast chicken and
corn casserole for dinner, apple crisp
for dessert, and I might even try my hand at
making freezer jam.

But first, a card.


Isn't she sweet? I just love these Pure Innocence girls.
My local scrapbooking store carries a few so
I just had to pick one up when I was in there
the other day. The minute I saw her, I knew I wanted
to try paper-piecing on her dress. It's a technique that
I've admired on other's cards, but had never tried myself.
Until today. :o)

So, I paper-pieced her dress using a pattern from
the Everyday Tango collection by
My Mind's Eye, then colored the rest of her in
with Copic markers. I'm still learning how to get
the hair to look natural, but I feel like this is one of
my better attempts, so I'm happy.


After I got her all colored up, I stamped her
sentiment and then decided to cut her out
using my cuttlebug and Nestabilities label die.
It was quite the close trim, as you can see.
Next time, I'll cut out the shape and
THEN stamp the image so I can be sure
to center it properly. Oh well.

I also added a bit of Stickles
to the center of the flowers on her dress,
her heart-shaped hair barette,
and the bases of the flower petals.


I took the next size up die and cut out another
pattern from that same MME stack pack
and used it to mat my focal piece.

I decided that my blue Bazzill cardfront
needed some dressing up, so I took
the Hero Arts canvas stripe cling stamp
and inked it up with Chipped Sapphire and
Tumbled Glass Distress Ink.
Spritzed it a little with my Mini Mister
and stamped it on the card. I used my
Fiskars stamp press to line up the lines.


After that, all that was left was to
make a slit in the spine of the card to
tie my Offray ribbon through
and mount my image up with
dimensional adhesive.

I hope you like it!
If you haven't yet entered my blog candy
giveaway, be sure to scroll up to the top
and do so. There's still plenty of time!
Have a great day!

Friday, October 15, 2010

Have A Little Cake

Good morning, ladies!

Just a super-quick card
I whipped up last night for a
little girl in one of my sons classes
who is having a birthday party tonight.

Her name is Tillie, short for Matilda.
Isn't that sweet?
I figured such a sweetly named girl
needed a sweet card,
so that's exactly what I made.


I started with pink Bazzill cardstock folded
into a standard-sized card,
then trimmed out this "sweets" print
from DCWV to slightly smaller.
Adhered it with Tombow Permanant Dot
tape runner -- my go to adhesive.


I actually combined two different stamps to make
up my sentiment: "have a little cake" is by
Inkadinkado -- I stamped that first with
Hero Arts Shadow Ink in Soft Pool.
Then I added the Penny Black "happy birthday!"
stamped with Colorbox Fluid Chalk
in Chestnut Roan.
Then I rounded the corners with my
We R Memory Keepers Corner Chomper.

I added some pink polkadot ribbon
from Dashes, Dots, & Checks,
then adhered my sentiment overtop with dimensional
adhesive. To make the edges more defined,
I went around them with the side of my Copic
markers R20 and R24.


Couldn't hardly get much simpler. :o)

Have you seen my blog candy giveaway yet?
Make sure you scroll up and
find out how to enter!

Have a great weekend, all!


Tuesday, October 12, 2010

I Heart U

Hello there!
Man, is it just me, or has the blogosphere
been super-quiet today?
I must have visited 30 blogs today and
not a single one had a new post.
Nope. Strike that.
Lawn Fawn did.
Isn't Kelly Marie amazing?

Well, if you're feeling lonely online
come right over here and pull up a seat
because I've got a new card to share!


I just love these little birdies.
They were totally the inspiration for 
this card. The paper is from Basic Grey.
I trimmed it down to slightly smaller than
my black Bazzill cardfront,
then cut out a circle window with
my Nestabilities and Cuttlebug.


I set that aside and trimmed down a scrap
of green My Mind's Eye paper
as a backdrop. I stamped my sentiment
from Hampton Arts twice --
once in black and one in Watermelon
then cut out the heart and popped that up
with dimensional adhesive.

Then I took my BG birdie piece and
popped that up as well.
Added some Offray ribbon
and some white stitching lines
with a white gel pen.


I hope you like it!

I also wanted to mention that
I'm putting together a little
BLOG CANDY GIVEAWAY
as a thank you to my wonderful
blog readers and in honor of
my 10th Wedding Anniversary (yay!)
later this month.
More details to come on that.

Have a great night everybody!

Sunday, October 10, 2010

Hugs and Kisses

Hello, ladies!
How are you? Good, I hope.
I'm in an especially good mood tonight because
I had a little extra time to get crafty this weekend.
Would you like to see what I made?


I started by trimming down this sweet
leafy print by Making Memories.
The back side was covered in these adorable
ladybugs, so I trimmed out three in various sizes.

I tied on a length of ribbon from
the Girl's Paperie (isn't it pretty?)
and added a button from my stash.


I then matted my leafy print with a
pink vine print from My Mind's Eye,
and adhered the entire thing to
some pink Bazzill cardstock
folded into a standard-sized card.

I put together my sentiment from
The Paper Studio's mix and match sentiments
set (I would have liked to close the bottom of
the "h" so it would read "bugs & kisses"
but I didn't have the right color pen)
and stamped it with 
Watermelon Ink It Up ink.


And all that was left to do was to pop off
the little ladybugs with dimensional adhesive.
Pretty quick and easy, but I really love
how it turned out.

Thanks so much for stopping by!

Thursday, October 7, 2010

Storage Solutions: Finished Cards


Just a super-quick post tonight.
I don't know if you're like me --
always in search of a better way to organize your craft space
to make room for new goodies. ;o)

I was recently asked about how I store my finished cards,
so I thought I'd share a photo.


This is the bookcase in my office.
On the middle shelf there, I have three CD boxes.
I picked them up at Walmart for $6 each.
They're from Mainstays, I believe,
and they come in a couple colors.
I picked them up one at a time,
so the cost wasn't much all at once.

They're the perfect size for cards.
I store folded cardstock in one
(Since a sheet of cardstock makes two cards,
I always fold the second one and save it for later use.),
envelopes in another,
and finished cards in the third.


Just one is enough for the finished cards I have right now.
I try to force myself to actually send them out,
rather than hoard them as I'd like to.
I keep reminding myself that the reason I make cards
is to brighten other people's day.

There's no day-brightening going on
if I keep them all to myself. ;o)
I like to look at pretty things.
That's why the top shelf (not shown)
is dedicated to showcasing my most recent projects.
That way I can look at them for a week or so
before sending them out
or relagating them to the box for later use.

Anyway, I hope that tip helped!
Nighty-night!

Monday, October 4, 2010

O, Solo Mio

Wow, can you believe another week has gone by?
I was itching to get in my craft room all last week,
but it just didn't happen. Sigh.
Sometimes life is just like that.
But I made sure to get something cranked out today!
Check it out.


I've been wanting to use my Lawn Fawn "Critters in the 'Burbs"
again for a while. These little animals are soooo cute!
I had this idea for making a "Missing You" card
with a twist, featuring a singing cat at night, a la Garfield.
Only cuter.

I found this old Cosmo Cricket sheet of paper at work
that had been in the stockroom for who knows how long.
I've never seen or heard of the collection before.
It had this kind of tapestry print, which I thought would give the
cat's fur some interesting texture and color variation.


I folded a sheet of Midnight Blue Bazzill cardstock into a
4 1/4 x 4 1/4 square card, then covered it with starry sky paper
from Frances Meyer. I trimmed a green scrap from My Mind's Eye
into fringe for grass, then ruffled it up a bit to make it look
more natural.

I needed a moon, but Lawn Fawn doesn't have a moon stamp yet,
so I used one from Elzybells, a company that I only
recently discovered -- just before they closed their doors
for good. Sad, isnt' it?
Their images are so whimsical and quirky,
very much along similar lines as Lawn Fawn, which is why
I thought the two might work together here.


To finish up I took out Harold's ABCs and spelled out
"O, Solo Mio" and drew a speach bubble around it.
I also drew three musical notes just to make it clear
that he's singing, and cut those out.

I adhered my cat, moon and sentiment with pop dots and
tied on a bit of white embroidery thread as a final touch.

I think he turned out pretty cute. :o)
Have a great night, all!

LinkWithin

Related Posts Plugin for WordPress, Blogger...